It began with the mosaic bird house and continued into yard art. Making mosaics is relaxing, creative and fun. I especially like taking a hammer to break-up the tile!
I wanted to do a lizard on a rock, but didn't want to spend the day breaking tile into tiny bits, so I roughed out the largest part of the body. Using an exterior adhesive, I arranged the tiles and tumbled stones on the rock.
Then I applied gout around them.
After a few days of drying, I painted in the detail of the lizard with acrylic paints and sealed it all.
Now our western fence lizards have their own art to sit on. And even during the winter, I know there will be one lizard visible in the garden.
Birds live and nest in my yard. Cavity nesting species can have a difficult time finding natural cavities in an increasingly human altered landscape. Dead trees are quickly removed for fire prevention or because people don't like dead plants. Unfortunately most people don't realize the diversity of life that can continue to live in a dead tree.
I've been putting up birdhouses around my yard for several years. The Bewick's wrens have taken advantage of these dwellings on several occasions. The oak titmouse pair inspects the real estate, but have yet to move in. There is the wine cork house, the lariat house, the wooden nestbox and the chicken pot, which wasn't supposed to be a bird house but the wrens thought otherwise.
The inspiration from my recent visit to a local Garden Show, spurred me to finish this mosaic birdhouse. The structure is a wooden birdhouse purchased from a local craft store. I made a point of looking for a shape and entry size that were attractive to my wrens.
Bits of leftover tile, glass beads and polished stones were glued onto the structure with a tile adhesive. I topped it with a glass bird that had broken off of a swizzle stick provided by my friend Kim. Grout filed the spaces between the tiles and then the whole thing was sprayed with a sealer.
The intent was decoration, but the Bewick's wren pair are inspecting it already. They've just fledged their second clutch of kids this year. Maybe their third will grow-up in the mosaic house.
The flower diversity at the Southern California Spring Garden Show prompted Douglas Welch of A Gardener's Notebook and I to talk about plant propagation.
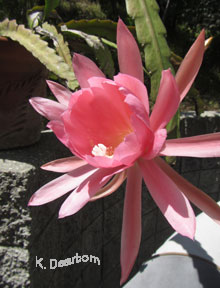
I've successfully grown two variety of epiphyllum for years. The Sunset Western Garden Book gives the common name of "orchid cactus" for epiphyllum. Epiphyllums are a type of cactus with long flat stems that are scalloped along the edges and give the appearance of leaves. The few spines are at the base of these scallops.
These plants naturally come from the forests of Central and South America where rain is frequent. It is odd to think of forest cactus, but that is what these plants are. They have small shallow roots and typically settle into the nooks and crannies in trees and between rocks. Here in pockets of leaf litter, they thrive on rain water and nutrients washing off the surrounding plants.
The wild plants have large, mostly white-or-cream-colored flowers that bloom at night with a heavy scent. They are pollinated by bats and they produce a fruit that is also eaten by mammals, who then disperse the seeds. Hybridized plants come in a broad spectrum of colors (ESA display at Garden Show) and they tend to flower during the day.
I'm going to share my plants with Douglas. Following the advice of the Epiphyllum Society of America, I cut off a blade and let it heal in a dark dry place for up to 10 days. One of the sections I selected already had a root forming when I cut it.
Douglas can now plant these in a loose soil of bark, sand and potting mix. Let it sit without water for 2 weeks then gradually begin to water occasionally. Once rooted they should be kept moist but not wet. I've found clay pots hold moisture during our hot summer without keeping the plants too wet. It takes about 2 years for a cutting to bloom.
 |
| just about to bloom |
To get the right amount of air flow, my pots are up on the edge of a wall in partial shade. The second perk to this location is that the sprinklers just lightly reach them.
While epiphyllums are not native to Southern California, the large valley carpenter bee will visit the blooms. Western fence lizards appreciate the elevated location and linger in the pots. And when the blooms open I am reminded how their shape is perfect for hugging a nectar eating bat.